
Streetscape photography is more than just photographing urban environments; it's about capturing the pulse of a city, the dance of light and shadows, and the silent stories unfolding between people and architecture.
With the right planning, attention to detail, and creative vision, you can turn every street corner into a powerful image. Ready to unlock the secrets? Let’s dive in!
Quick Facts
- Skill Level: Beginner to Advanced
- Best Time to Shoot: Blue Hour, Golden Hour, Early Morning
- Recommended Gear: Camera with good ISO performance, 24–70mm lens, tripod
10 Secrets of Streetscape Photography
1. Find the Perfect Location
One of the biggest keys to successful streetscape photography is choosing the right location. Fortunately, platforms like Locationscout make this easier than ever. They offer an incredible database of inspiring spots worldwide, where you can discover unique urban scenes, hidden gems, and iconic views shared by other passionate photographers.
However, finding a location online is just the first step. To truly master a spot, I highly recommend doing virtual scouting before your trip.
Use Google Street View to digitally walk around the streets, explore different angles, check the surroundings, and even analyze the light direction based on the time of day. This way, you can already pre-plan compositions and identify possible challenges or opportunities that won’t be obvious from a single photo you see online.
One important tip, especially when shooting in small villages (like in Italy or southern Europe):
Many of the streetlights in small towns are privately owned by the house owners and might not automatically turn on after sunset.
If you are planning a shoot where you rely on a specific lamp or ambient light to illuminate your scene, it’s crucial to either visit the location in person before or speak to locals.

2. Make Bad Weather Your Ally
Many photographers tend to avoid going out when the weather looks bad — but in streetscape photography, bad weather can become your secret weapon. Rain, fog, and snow offer creative possibilities that simply aren’t available on sunny days.
Rain transforms ordinary streets into vibrant scenes. Wet surfaces act like mirrors, reflecting neon lights, streetlamps, and city colors to create dramatic effects. Shooting during or just after rain, especially around the blue hour, gives your images an added dimension of depth and atmosphere.
Fog can completely change the mood of an urban scene. It softens the light, reduces contrast, and creates a cinematic, dreamy feeling. Moderate fog is usually the most effective — it adds mystery without hiding too many details.
If the fog becomes too dense, artificial lights can scatter heavily, turning the scene into a messy blend of colors and causing a loss of structure and clarity. Instead of well-defined forms, everything becomes a colorful haze.
That’s why it’s often best to shoot when the fog is present but not overwhelming.
Snow adds a layer of magic to cityscapes. A fresh, thin layer of snow brightens the streets, reflects urban lights beautifully, and simplifies busy scenes. Snow also softens textures and enhances the contrast between warm and cool light sources in the city.
Pro Tip: Always bring a microfiber cloth to wipe your lens. Moisture from rain or fog can easily ruin a shot if you don’t keep your glass clean!
Bad weather doesn’t ruin a shoot — it gives you a chance to create more emotional, unique, and atmospheric images that truly stand out.

3. Choose the Right Camera and Lens
In streetscape photography, your gear can make a real difference — especially when working with difficult light or aiming for specific compositions.
Cameras with strong ISO performance (like full-frame or medium-format models) allow you to shoot clean images even in the low-light conditions common in urban environments.
If you’re shooting during blue hour, early morning, or after sunset, a camera that handles high ISO values with minimal noise is a true advantage.
When it comes to lenses, a 24-70mm zoom is one of the most versatile choices.
You can easily switch between wide scenes and more compressed, intimate frames without changing lenses — essential when working fast in urban settings.
A key reason to favor the longer end (around 50 to 70mm) is scene compression:
- Telephoto lenses compress space, making buildings appear closer together and backgrounds feel more dramatic.
- This effect can create a much stronger, more emotional connection between different elements in your frame.
In contrast, shooting too wide often spreads the scene out, making urban environments feel empty or disconnected.
Choosing the right focal length helps create images that feel denser, more intimate, and full of story.
Tip: Try framing your subject between 50mm and 70mm next time, and notice how much more "cinematic" and powerful your streetscapes can feel.

24mm on the left vs 70mm on the right: The man remains in exactly the same spot — only the shooting angle and focal length are different.
4. Embrace Tripods
A tripod might seem like an extra burden when shooting in the streets, but it’s actually one of your most powerful tools for streetscape photography.
Even when shooting single exposures, a tripod helps you slow down, refine your composition carefully, and maintain perfect framing for critical shots.
But it’s absolutely essential when you start using multi-exposure techniques:
- Multi-Exposure: Shooting different frames for different needs — one with low ISO and longer shutter time to capture the clean static scene, and another with higher ISO and faster shutter speed to freeze moving elements like people.
➔ Later, you can blend these exposures together for a perfect final image. - Time Blending: Capturing the same composition over a longer period to combine the best light moments, like blue-hour skies and illuminated buildings.
Without a tripod, slight movements would make these techniques impossible.
Tip: A tripod isn’t just for sharpness. It’s the key to creative flexibility and complex scene building.
In streetscape photography, using a tripod turns you from a reactive shooter into a deliberate visual storyteller.

The same composition at different times.

The final result with different times blended into one final photo.
5. Understand the Power of Light
Light is the soul of every photograph, and in streetscape photography, understanding its behavior is crucial.
Blue Hour (the time shortly after sunset or just before sunrise) offers a perfect balance:
- There’s still enough ambient natural light to softly fill the shadows.
- City lights like street lamps and neon signs start to glow, but they don’t overpower the scene yet.
- Colors become richer and more saturated, giving your images a cinematic mood.
True night photography (after the blue hour ends) often leads to extremely high contrast scenes:
- Bright streetlights can blow out highlights.
- Shadows become completely black.
- Exposure becomes tricky, and details get lost.
Tip: If you want a "night mood" but still retain detail and control over your highlights and shadows, aim to shoot toward the end of the blue hour. This way, you get the best of both worlds: the emotional depth of nighttime without losing technical quality.
Shooting during this window also helps you maintain faster shutter speeds without cranking up the ISO too much — essential if you’re capturing moving elements like people or cars.
The right light doesn’t just illuminate your scene — it sets the emotion and tells the story.

6. Work with Urban Light Sources
In streetscape photography, urban lights are not just background elements — they are essential tools for your image composition.
Streetlights, neon signs, shop windows, illuminated advertisements – all these light sources help you not only to brighten the scene but also to structure your image.
When planning your composition, actively think about how the light sources interact with your subjects:
- Position lamps and windows in places where you expect people to walk through.
- Align your framing so that key elements, like pedestrians or cyclists, are illuminated naturally as they move through the scene.
- Make sure the light helps to highlight and separate your subjects from the background, instead of distracting or overwhelming the image.
Without enough light, moving people will often turn into blurry silhouettes due to slow shutter speeds.
With smart light placement, you can capture them sharply and create dynamic, vibrant city life images.
Tip: Always pre-visualize:
Ask yourself while composing — "Where do I want the people to appear? Where is the light strongest?"
Build your frame so the action happens in the light, not in the dark corners.
Urban light sources are not just there to illuminate — they help you control the viewer’s eye and tell a stronger story.

7. Master Basic Composition Techniques
Even in the chaotic environment of a city, strong composition remains the foundation of powerful streetscape photography.
Two of the most essential concepts are:
- Rule of Thirds: Divide your frame into a 3x3 grid, and place key elements along the lines or at the intersections.
➔ This creates a natural balance and leads the viewer’s eye through the scene. - Golden Ratio (Fibonacci Spiral): A more advanced compositional guide that uses a natural curve to draw attention to the most important parts of your image.
➔ It often feels more organic and dynamic compared to the strict Rule of Thirds.
In streetscape photography, mastering these basic structures helps you bring order to busy urban scenes.
Instead of random chaos, your photos will feel deliberate and engaging.
Tip: Always ask yourself:
"What is the main subject? Where do I want the viewer’s eye to go first?"
Then use these compositional tools to guide the eye naturally toward that subject.
Good composition doesn’t just organize elements — it tells a story through visual flow.

Rule of Thirds

Golden Ratio (Fibonacci Spiral)
8. Play with Color Harmonies and Contrasts
Color is one of the most powerful storytelling tools in streetscape photography.
Using it consciously can dramatically increase the emotional impact of your images.
First, a quick foundation:
- RYB (Red, Yellow, Blue) is the traditional color model based on mixing pigments.
- RGB (Red, Green, Blue) is the digital color model based on mixing light.
In both systems, complementary colors are pairs that sit opposite each other on the color wheel:
- In RYB, examples include Red–Green, Blue–Orange, and Yellow–Purple.
Placing complementary colors in your frame creates strong contrast and visual tension, immediately drawing the viewer’s eye and adding energy to the scene.
Tip: One of the most effective combinations in urban photography is blue hour ambient light combined with warm streetlights— a natural blue-orange contrast that adds instant drama.
Mastering complementary colors gives your photos more depth, excitement, and emotional resonance.


9. Integrate People into Your Scene
Adding people to your streetscape images brings life, scale, and emotional connection.
But to capture them effectively, you need to plan ahead.
While building your composition, think about where you want people to appear:
- Position light sources like streetlamps so that they naturally illuminate the areas where people will walk.
- Leave visual "entry points" in your frame that guide moving subjects into the scene.
Tip: Light and composition should work together to "invite" people into the right part of the image.
When photographing people, shutter speed becomes critical:
- As a basic rule, you should always aim to shoot with the fastest possible shutter speed to keep moving subjects sharp.
- However, in darker environments — especially during the blue hour or night — you often won’t be able to reach ideal speeds without sacrificing image quality.
In these situations, you have to choose the best compromise for your image:
- Accept a higher ISO (and therefore more noise),
- Or accept a slightly slower shutter speed (and therefore some motion blur).
Finding the right balance depends on your personal priorities for the final look of the photo.
A practical guideline with recommended minimum shutter speeds is included in the graphic below.
Planning human movement into your composition helps your images tell a much stronger and more authentic story.

For the group in the red circle, which is further away, a shutter speed of at least 1/40 second is recommended to avoid motion blur. The man in the yellow circle, who is closer to the camera, needs at least 1/60 second, ideally 1/80 second, for a sharp shot.

10. Post-Processing: From Good to Great
Post-processing is where you bring the full potential of your streetscape photography to life.
But great editing doesn’t just happen afterwards — it starts already while shooting.
You should always think about how you plan to edit the scene when you press the shutter:
- Single Shot: If you’re working with just one exposure, you need to accept certain limitations — especially regarding dynamic range and noise. Careful light control during shooting becomes even more important.
- Multi-Exposure or Time Blending:
➔ Advanced techniques allow you to capture different parts of a scene under ideal conditions:
- One shot for the sky,
- One for the city lights,
- Another for fast-moving elements like people or vehicles.
➔ Later, these exposures are blended to create a seamless, perfectly balanced image.
➔ This approach requires precise planning during shooting to ensure perfect alignment and logical light transitions.
Post-processing in my workflow is not just a quick fix — it’s a critical part of the final creative output.
Depending on the complexity of the image, editing can take anywhere from 30 minutes to 5, 6, or even 8 hours per photo.
In post-processing, I focus heavily on:
- Enhancing and refining light and shadow through techniques like Dodge & Burn.
- Carefully balancing and intensifying colors to support the mood of the image.
- Amplifying all the intentional color zones, light zones, and compositional structures that were planned during the shooting phase.
Tip: Editing isn’t about "saving" a photo — it’s about elevating the story you built during shooting to its full artistic potential.
In advanced streetscape photography, shooting and editing are two sides of the same creative process — one cannot fully succeed without the other.

Raw photo

Final edit
Bonus: 5 Hidden Gems for Your Next Streetscape Adventure
Lincoln Cathedral, England
A masterpiece of Gothic architecture, offering stunning scenes during both Golden Hour and Blue Hour. Especially during the blue hour, the cathedral’s intricate stonework glows beautifully against the deepening sky.

Get the exact geo-position for this spot: Lincoln Cathedral and Pub
Teatro Bellini, Catania, Sicily
Baroque beauty surrounded by lively Sicilian streets. A perfect spot to capture the vibrant mix of old-world charm and modern city life.

Get the exact geo-position for this spot: Teatro Bellini, Catania, Sicily
Two Secret Spots in Rome, Italy
Beyond the famous landmarks, Rome hides countless treasures: Narrow alleys, ancient walls, and unexpected frames where history and everyday life collide.

Get the exact geo-position for this spot: Secret Streetscape, Rome

Get the exact geo-position for this spot: Rome – Ancient Alley
View of Pietrapertosa, Italy
A breathtaking ancient village carved into the mountains. Capturing the scene during soft evening light or the charms of the blue hour brings out the rich textures and timeless atmosphere of the stone houses.

Get the exact geo-position for this spot: Pietrapertosa Ancient Village
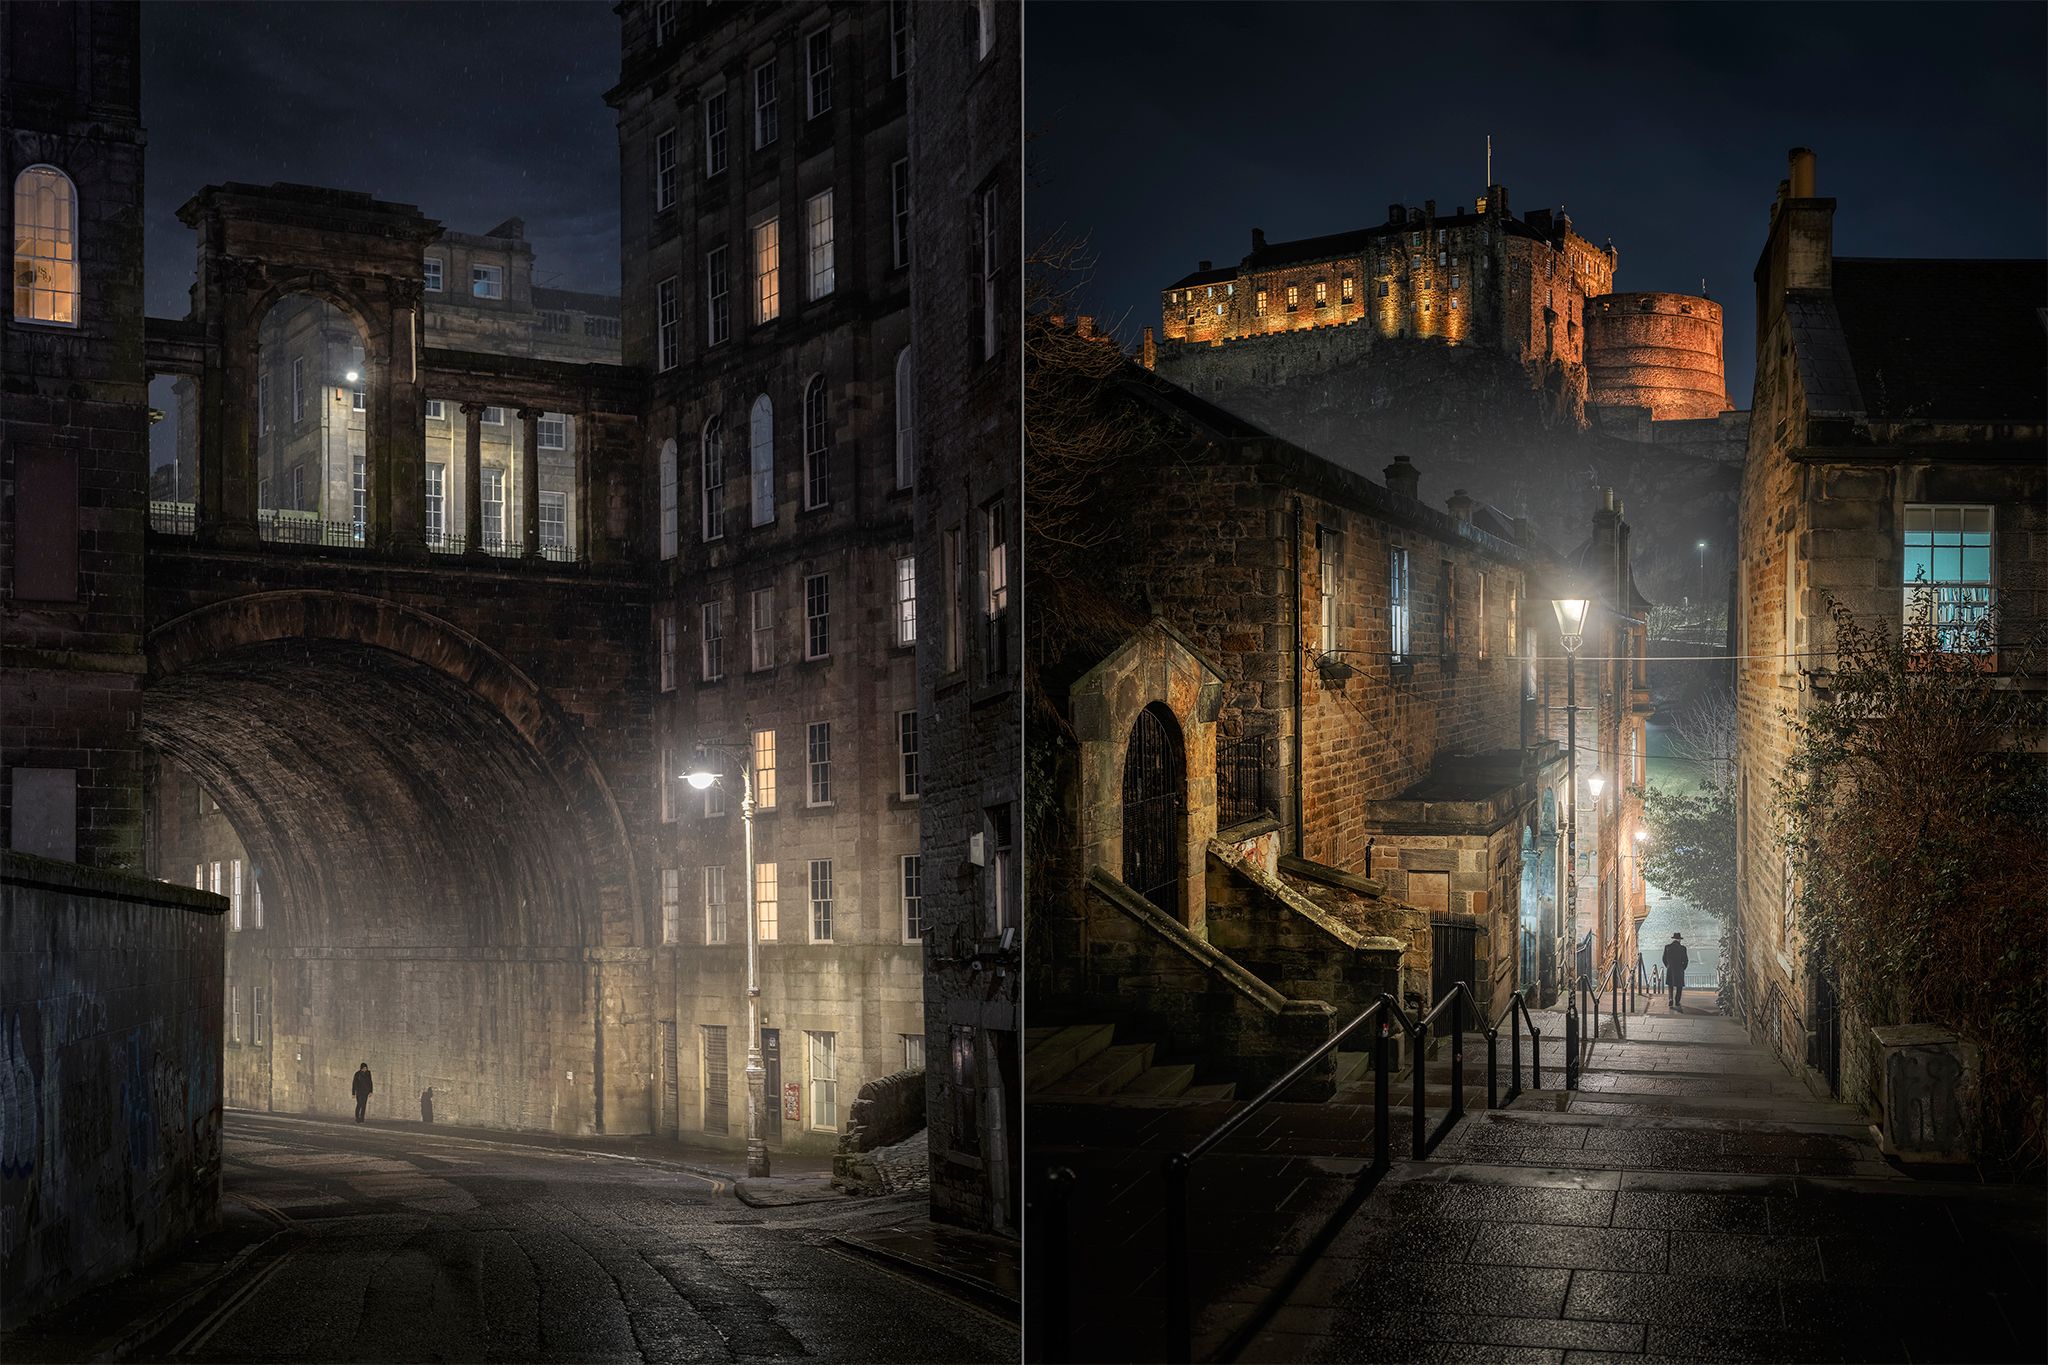
Dean Village, Edinburgh, Scotland
While Dean Village is well known, this view captures a more hidden corner, away from the river and a little off the main path, offering a quieter, less familiar side of Edinburgh’s fairytale atmosphere.

Get the exact geo-position for this spot: Dean Village Secret Spot, Edinburgh
Unlock Your Streetscape Potential
If you’re ready to take your streetscape photography to the next level. I invite you to discover my complete Streetscape Photography Bundle — designed to guide you through every step of the creative process:
- A 166-page eBook covering photography fundamentals, composition, light, color theory, and advanced techniques.
- Over 2 hours of detailed video tutorials showing real-world editing workflows and creative approaches.
- The powerful AF-V2 Photoshop Panel to speed up and simplify your post-processing.
➔ Learn more and start transforming your streetscapes today!
The AF-V2 Photoshop Panel isn’t just another luminosity mask tool — it’s a full workflow solution developed specifically for photographers who want more creative control with less technical hassle.

The powerful AV-V2 Photoshop Panel
With the AF-V2 Panel, you can:
- Create precise luminosity masks,
- Easily apply Dodge & Burn to guide light and focus,
- Control color zones and contrasts intuitively,
- Sharpen and enhance details selectively,
- And manage your entire post-processing workflow much more efficiently.
It’s designed to make professional techniques accessible and fast, freeing you to focus on what matters most: your creative vision.

The full Streetscape Bundle with the most comprehensive eBook about this topic, over 2 hours of in-depth video tutorials, and the powerful AF-V2 Photoshop Panel.
Locationscout Premium Members also get exclusive access to an additional short video tutorial: A deep dive into my Dodge & Burn workflow — including how I use the panel to craft professional-quality edits step by step.
As a thank you for reading, you can get an exclusive 35% discount on the complete Streetscape Photography Bundle. Simply use the code LOCATIONS35 during checkout!
➔ Learn more and start transforming your streetscapes today!


Comments (2)